Tag: sourceedit |
Minor edit (→top: Removal of TalkpageBox template - Talk pages are deprecated) |
||
| (21 intermediate revisions by 6 users not shown) | |||
| Line 1: | Line 1: | ||
| + | |||
| − | <noinclude>{{TalkpageBox}} |
||
| ⚫ | The ''Driving Missions'' hall of [[Gran Turismo 4]]'s GT Mode houses 34 A-Spec based challenges known as '''Driving Missions'''. These missions test the players' skills of overtaking, clean racing and slipstreaming. Each mission rewards the player with 250 A-Spec points as well as a varying amount of Credits. |
||
| − | </noinclude> |
||
| ⚫ | The ''Driving Missions'' hall of [[Gran Turismo 4]]'s GT Mode houses 34 A-Spec based challenges known as '''Driving Missions'''. These missions test the players' skills of overtaking, clean racing and slipstreaming. Each mission rewards the player with 250 A-Spec points as well as a varying amount of |
||
The missions are split into five categories, each one awarding a different prize car upon their completion. Each category tests a different skill. A 5-second rev-limit penalty is incurred if the driver makes heavy contact with their opponent or the walls. |
The missions are split into five categories, each one awarding a different prize car upon their completion. Each category tests a different skill. A 5-second rev-limit penalty is incurred if the driver makes heavy contact with their opponent or the walls. |
||
| Line 11: | Line 10: | ||
===Mission 1=== |
===Mission 1=== |
||
| − | [[File:GT4 Mission 1.jpg|right]] |
+ | [[File:GT4 Mission 1.jpg|240px|right]] |
Your Car |
Your Car |
||
| − | *[[Fiat 500 R |
+ | *[[Fiat 500 R '72]] |
Rival Car(s) |
Rival Car(s) |
||
| − | *[[Fiat 500 R |
+ | *[[Fiat 500 R '72]] |
Track |
Track |
||
*Deep Forest Raceway: 1st corner |
*Deep Forest Raceway: 1st corner |
||
| Line 35: | Line 34: | ||
===Mission 3=== |
===Mission 3=== |
||
| − | [[File:GT4 Mission 3.jpg |
+ | [[File:GT4 Mission 3.jpg|240px|right]] |
Your Car |
Your Car |
||
*[[Alfa Romeo Giulia Sprint GTA 1600 '65]] |
*[[Alfa Romeo Giulia Sprint GTA 1600 '65]] |
||
| Line 41: | Line 40: | ||
*[[Alfa Romeo Giulia Sprint GTA 1600 '65]] |
*[[Alfa Romeo Giulia Sprint GTA 1600 '65]] |
||
Track |
Track |
||
| − | *Cote d'Azur |
+ | *Cote d'Azur, Massenet to Mirabeau |
In-game Information |
In-game Information |
||
| Line 48: | Line 47: | ||
===Mission 4=== |
===Mission 4=== |
||
| − | [[File:GT4 Mission 4.jpg|right]] |
+ | [[File:GT4 Mission 4.jpg|240px|right]] |
Your Car |
Your Car |
||
*[[Ford Mustang GT '05]] |
*[[Ford Mustang GT '05]] |
||
| Line 76: | Line 75: | ||
[[file:GT4 Mission 6.jpg|240px|right]] |
[[file:GT4 Mission 6.jpg|240px|right]] |
||
Your Car |
Your Car |
||
| − | *[[Mazda MX-5 1800 RS (NB, J) '00]] |
+ | *[[Mazda MX-5 1800 RS (NB, J) '00]]/[[Mazda MX-5 Miata 1800 RS (NB, J) '00]]/[[Mazda Roadster 1800 RS (NB) '00]] |
Rival Car(s) |
Rival Car(s) |
||
| − | *[[Mazda MX-5 1800 RS (NB, J) '00]] |
+ | *[[Mazda MX-5 1800 RS (NB, J) '00]]/[[Mazda MX-5 Miata 1800 RS (NB, J) '00]]/[[Mazda Roadster 1800 RS (NB) '00]] |
Track |
Track |
||
| − | *Tsukuba Circuit: Dunlop Bridge |
+ | *Tsukuba Circuit: Dunlop Bridge to Final Hairpin |
In-game Information |
In-game Information |
||
| Line 104: | Line 103: | ||
*[[Nissan 350Z Gran Turismo 4 Limited Edition (Z33) '05]] |
*[[Nissan 350Z Gran Turismo 4 Limited Edition (Z33) '05]] |
||
Rival Car(s) |
Rival Car(s) |
||
| + | *[[Infiniti G35 COUPE '03]]<ref>NTSC-US Version only</ref>/[[Nissan SKYLINE Coupe 350GT '03]]<ref>NTSC-J, PAL, NTSC-K versions only</ref> |
||
| − | *[[Infiniti G35 COUPE '03]] |
||
Track |
Track |
||
*Trial Mountain: 1st tunnel |
*Trial Mountain: 1st tunnel |
||
| Line 113: | Line 112: | ||
===Mission 9=== |
===Mission 9=== |
||
| + | [[File:GT4 Mission 9.jpg|240px|right]] |
||
Your Car |
Your Car |
||
*[[Honda Mobil 1 NSX (JGTC) '01]] |
*[[Honda Mobil 1 NSX (JGTC) '01]] |
||
| Line 118: | Line 118: | ||
*[[Honda TAKATA DOME NSX (JGTC) '03]] |
*[[Honda TAKATA DOME NSX (JGTC) '03]] |
||
Track |
Track |
||
| − | *Twin Ring Motegi |
+ | *Twin Ring Motegi Road Course: 90-degree Corner |
In-game Information |
In-game Information |
||
| Line 125: | Line 125: | ||
===Mission 10=== |
===Mission 10=== |
||
| + | [[File:GT4 Mission 10.jpg|240px|right]] |
||
Your Car |
Your Car |
||
| − | *[[Renault AVANTIME |
+ | *[[Renault AVANTIME '02]] |
Rival Car(s) |
Rival Car(s) |
||
| − | *[[Renault AVANTIME |
+ | *[[Renault AVANTIME '02]] |
| − | *[[Renault AVANTIME |
+ | *[[Renault AVANTIME '02]] |
| − | *[[Renault AVANTIME |
+ | *[[Renault AVANTIME '02]] |
Track |
Track |
||
| − | *Sarthe |
+ | *Circuit de la Sarthe I: Mulsanne Straight |
In-game Information |
In-game Information |
||
| Line 144: | Line 145: | ||
===Mission 11=== |
===Mission 11=== |
||
| − | [[File:New York.jpg| |
+ | [[File:New York.jpg|240px|right]] |
Your Car |
Your Car |
||
*[[Toyota 2000GT '67]] |
*[[Toyota 2000GT '67]] |
||
Rival Car(s) |
Rival Car(s) |
||
*[[Mazda 110S (L10B) '68]] |
*[[Mazda 110S (L10B) '68]] |
||
| − | *[[Toyota CELICA |
+ | *[[Toyota CELICA 1600GT (TA22) '70]] |
*[[Mitsubishi GALANT GTO MR '70]] |
*[[Mitsubishi GALANT GTO MR '70]] |
||
*[[Nissan SKYLINE 2000GT-B (S54A) '67]] |
*[[Nissan SKYLINE 2000GT-B (S54A) '67]] |
||
| − | *[[Isuzu 117 COUPE |
+ | *[[Isuzu 117 COUPE '68]] |
Track |
Track |
||
*New York Reverse |
*New York Reverse |
||
| Line 165: | Line 166: | ||
*[[Ford GT LM Race Car Spec II|Ford GT LM Race Car Spec II '04]] |
*[[Ford GT LM Race Car Spec II|Ford GT LM Race Car Spec II '04]] |
||
Rival Car(s) |
Rival Car(s) |
||
| − | *[[ |
+ | *[[Dodge Viper GTS-R Team Oreca Race Car '00|Dodge Viper GTS-R Team ORECA Race Car '00]] |
*[[Chevrolet Corvette C5-R (C5) '00|Chevrolet Corvette C5R (C5) '00]] |
*[[Chevrolet Corvette C5-R (C5) '00|Chevrolet Corvette C5R (C5) '00]] |
||
*[[Chevrolet Camaro LM Race Car|Chevrolet Camaro LM Race Car '01]] |
*[[Chevrolet Camaro LM Race Car|Chevrolet Camaro LM Race Car '01]] |
||
| Line 178: | Line 179: | ||
===Mission 13=== |
===Mission 13=== |
||
| − | [[File:Opera Paris.jpg| |
+ | [[File:Opera Paris.jpg|240px|right]] |
Your Car |
Your Car |
||
*[[Peugeot 206 Rally Car '99]] |
*[[Peugeot 206 Rally Car '99]] |
||
Rival Car(s) |
Rival Car(s) |
||
| − | *[[Ford Focus |
+ | *[[Ford Focus Rally Car '99]] |
*[[Ford Escort Rally Car '98]] |
*[[Ford Escort Rally Car '98]] |
||
*[[Toyota COROLLA Rally Car '98]] |
*[[Toyota COROLLA Rally Car '98]] |
||
| Line 200: | Line 201: | ||
Rival Car(s) |
Rival Car(s) |
||
*[[Plymouth Cuda 440 Six Pack '71]] |
*[[Plymouth Cuda 440 Six Pack '71]] |
||
| − | *[[Buick Special '62 (SEMA Gran Turismo Awards 2003)|Buick Special]] |
+ | *[[Buick Special '62 (SEMA Gran Turismo Awards 2003)|Buick Special '62]] |
*[[Dodge Charger Super Bee 426 Hemi '71]] |
*[[Dodge Charger Super Bee 426 Hemi '71]] |
||
*[[Pontiac Tempest Le Mans GTO '64]] |
*[[Pontiac Tempest Le Mans GTO '64]] |
||
| Line 240: | Line 241: | ||
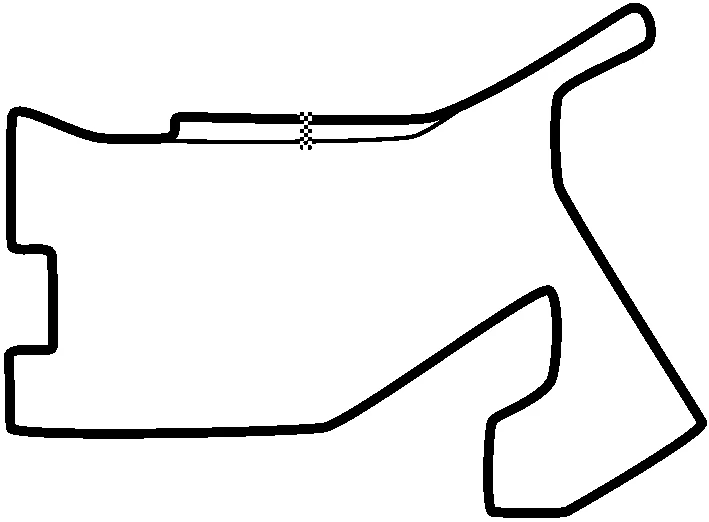
===Mission 17=== |
===Mission 17=== |
||
| − | [[File:Infineon Raceway Sports Car Course.jpg|240px|right]] |
+ | [[File:Infineon Raceway (Sports Car Course).jpg|240px|right]] |
Your Car |
Your Car |
||
*[[Audi R8 Race Car '01]] |
*[[Audi R8 Race Car '01]] |
||
| Line 366: | Line 367: | ||
Rival Car(s) |
Rival Car(s) |
||
*[[Nissan Fairlady Z 280Z-L 2seater (S130) '78]] |
*[[Nissan Fairlady Z 280Z-L 2seater (S130) '78]] |
||
| − | *[[Nissan 240ZG (HS30) '71]] |
+ | *[[Nissan Fairlady 240ZG (HS30) '71]]/[[Nissan 240ZG (HS30) '71]] |
| − | *[[Nissan 350Z (Z33) '03]] |
+ | *[[Nissan Fairlady Z Version S (Z33) '02]]/[[Nissan 350Z (Z33, EU) '03]]/[[Nissan 350Z (Z33, US) '03]] |
| − | *[[Nissan 300ZX 2seater (Z32) '89]] |
+ | *[[Nissan Fairlady Z 300ZX TwinTurbo 2seater (Z32) '89]]/[[Nissan 300ZX 2seater (Z32) '89]] |
*[[Nissan Fairlady Z 300ZX (Z31) '83]] |
*[[Nissan Fairlady Z 300ZX (Z31) '83]] |
||
Track |
Track |
||
| Line 406: | Line 407: | ||
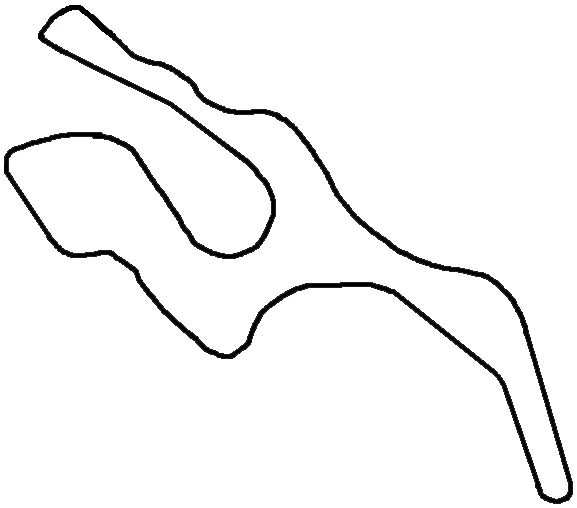
[[file:Fuji Speedway 2005.jpg|240px|right]] |
[[file:Fuji Speedway 2005.jpg|240px|right]] |
||
Your Car |
Your Car |
||
| − | *[[Toyota WEDSSPORT CELICA '03]] |
+ | *[[Toyota WEDSSPORT CELICA (JGTC) '03]] |
Rival Car(s) |
Rival Car(s) |
||
*[[Toyota CELICA 1600GT (TA22) '70]] |
*[[Toyota CELICA 1600GT (TA22) '70]] |
||
| Line 418: | Line 419: | ||
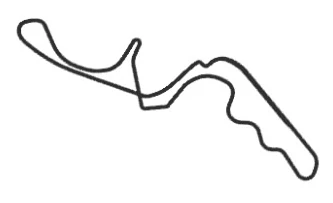
===Mission 29=== |
===Mission 29=== |
||
| − | [[file:Infineon Raceway Sports Car Course.jpg|240px|right]] |
+ | [[file:Infineon Raceway (Sports Car Course).jpg|240px|right]] |
Your Car |
Your Car |
||
*[[Chevrolet Corvette C5-R (C5) '00]] |
*[[Chevrolet Corvette C5-R (C5) '00]] |
||
| Line 432: | Line 433: | ||
==Missions 30-34: 1 Lap Magic (II)== |
==Missions 30-34: 1 Lap Magic (II)== |
||
| − | This mission set gets a lot more difficult compared to the previous set of 1 Lap Magic missions. Win this and you will be |
+ | This mission set gets a lot more difficult compared to the previous set of 1 Lap Magic missions. Win this and you will be awarded the Nissan R89C Race Car '89. |
===Mission 30=== |
===Mission 30=== |
||
| Line 479: | Line 480: | ||
===Mission 33=== |
===Mission 33=== |
||
| − | [[File:Infineon Raceway Sports Car Course.jpg|240px|right]] |
+ | [[File:Infineon Raceway (Sports Car Course).jpg|240px|right]] |
Your Car |
Your Car |
||
*[[Cadillac CIEN Concept '02]] |
*[[Cadillac CIEN Concept '02]] |
||
| Line 490: | Line 491: | ||
Track |
Track |
||
*Infineon Raceway (Sports Car Course) |
*Infineon Raceway (Sports Car Course) |
||
| − | In this mission, your car is the 750-horsepower Cadillac Cien. You start after the lead car 21 seconds. This car performs terribly when not in a straight line because it has very bad handling, very long gear shifting times(shifting from 1st gear to 2nd takes about a second), as well as poor brakes. Still, it performs better than the lead car, the Buick GNX. |
+ | In this mission, your car is the 750-horsepower Cadillac Cien. You start after the lead car 21 seconds. This car performs terribly when not in a straight line because it has very bad handling, very long gear shifting times(shifting from 1st gear to 2nd takes about a second), as well as poor brakes. Still, it performs better than the lead car, the Buick GNX. |
===Mission 34=== |
===Mission 34=== |
||
| Line 505: | Line 506: | ||
*Nürburgring Nordschleife |
*Nürburgring Nordschleife |
||
The final mission of ''Driving Missions'' section of the game. This mission is extremely difficult as you try to close a gap of 123 seconds between you (in a Mercedes SLR McLaren) and the lead car (the Mercedes 300SL), and that, even in a track like the Nordschleife, is a huge gap. To make matters worse, the SLR in this mission has average handling. The best tip here is to learn this track a lot. When you're confident enough that you think you might be able to beat this mission, go for it. |
The final mission of ''Driving Missions'' section of the game. This mission is extremely difficult as you try to close a gap of 123 seconds between you (in a Mercedes SLR McLaren) and the lead car (the Mercedes 300SL), and that, even in a track like the Nordschleife, is a huge gap. To make matters worse, the SLR in this mission has average handling. The best tip here is to learn this track a lot. When you're confident enough that you think you might be able to beat this mission, go for it. |
||
| + | ==References== |
||
| + | {{reflist}} |
||
[[Category:GT4 Gameplay Modes]] |
[[Category:GT4 Gameplay Modes]] |
||
Revision as of 00:15, 13 February 2019
The Driving Missions hall of Gran Turismo 4's GT Mode houses 34 A-Spec based challenges known as Driving Missions. These missions test the players' skills of overtaking, clean racing and slipstreaming. Each mission rewards the player with 250 A-Spec points as well as a varying amount of Credits.
The missions are split into five categories, each one awarding a different prize car upon their completion. Each category tests a different skill. A 5-second rev-limit penalty is incurred if the driver makes heavy contact with their opponent or the walls.
Missions 1-10: The Pass
These missions test the drivers ability to overtake a similarly competitive car. Missions 1-9 set the driver against one other car with a limited amount of track on which to overtake, while Mission 10 sets the driver against three others.
Successful completion of Missions 1-10 rewards the player with a DMC DeLorean S2 '04.
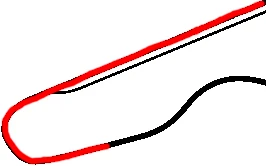
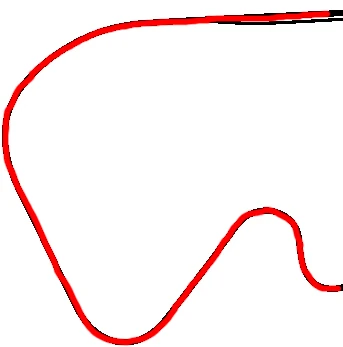
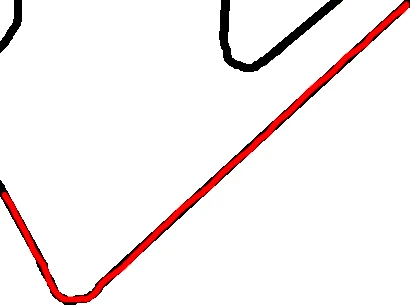
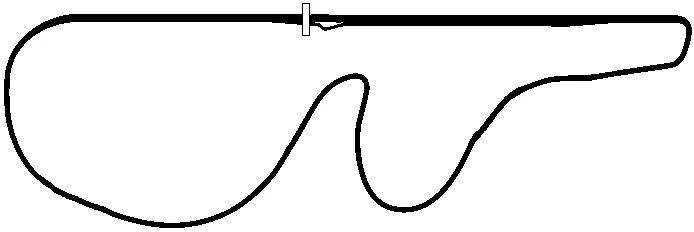
Mission 1
Your Car
Rival Car(s)
Track
- Deep Forest Raceway: 1st corner
In-game Information
The left corner just after you come over the hill is a passing point. Brake so that you go through on the inside of the rival car. Be careful because if you brake too late, you won't be able to stick to the inside of the corner. Try to find the brake timing that is not too early and not too late.
Mission 2
Your Car
Rival Car(s)
Track
- Grand Valley Speedway: 1st corner
In-game Information
This is the approach to the right-hand bend after the gentle left corner which is the only chance for overtaking. Point the car at the inside of the corner and brake whilst heading for the inside of the rival car. If you take a straighter braking line you can brake later than the rival car.
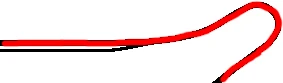
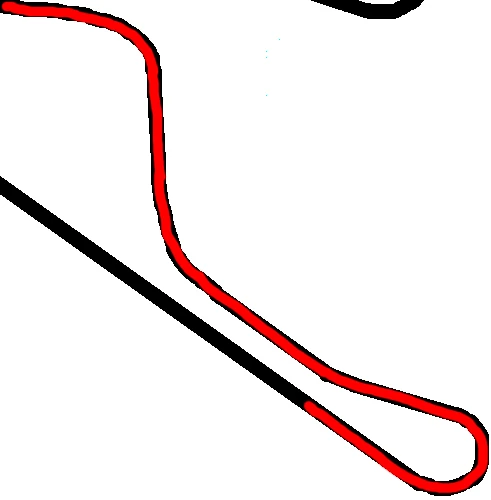
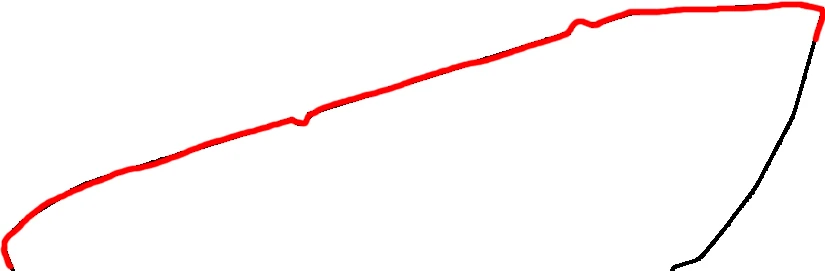
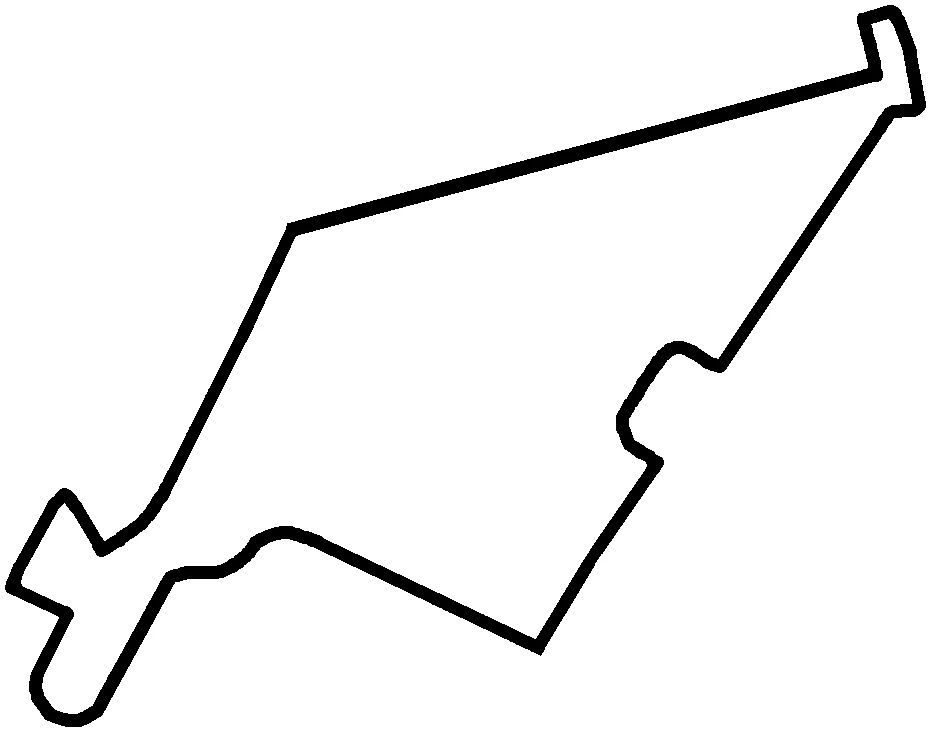
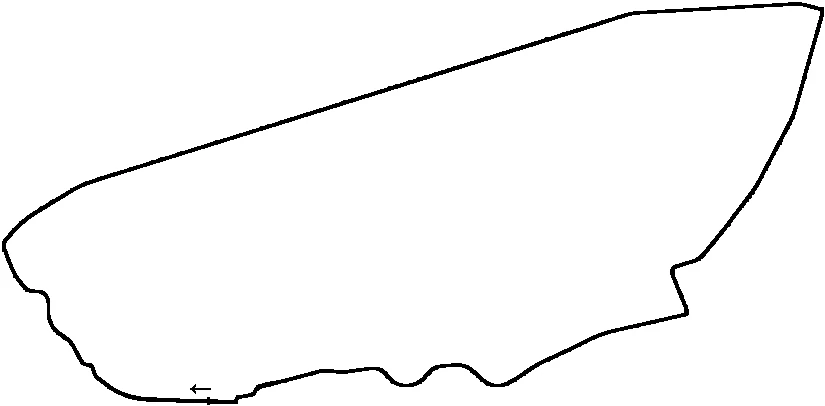
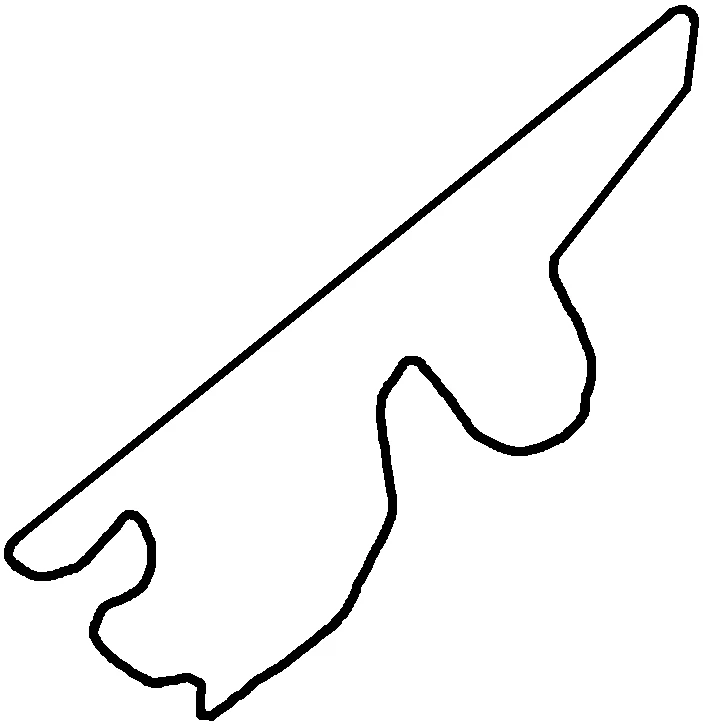
Mission 3
Your Car
Rival Car(s)
Track
- Cote d'Azur, Massenet to Mirabeau
In-game Information
There is a tight right turn right after the long downhill. Since this is a small corner, if you are going too fast you won't make it, so be careful - brakes are harder to apply whilst going downhill and there is a higher risk of oversteer.
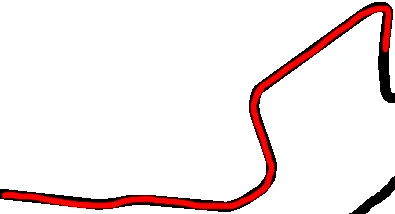
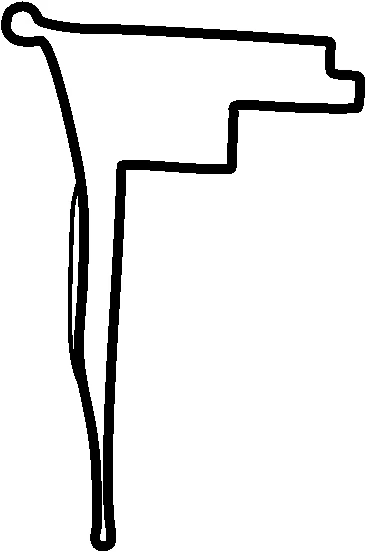
Mission 4
Your Car
Rival Car(s)
Track
- Seattle Circuit: 1st corner
In-game Information
The 180° right corner after the long straight is the passing point. As the road surface on the city streets is particularly flat and not banked towards the outside of the corner, it is essential that you do not brake too late, the deciding factor for winning in this mission.
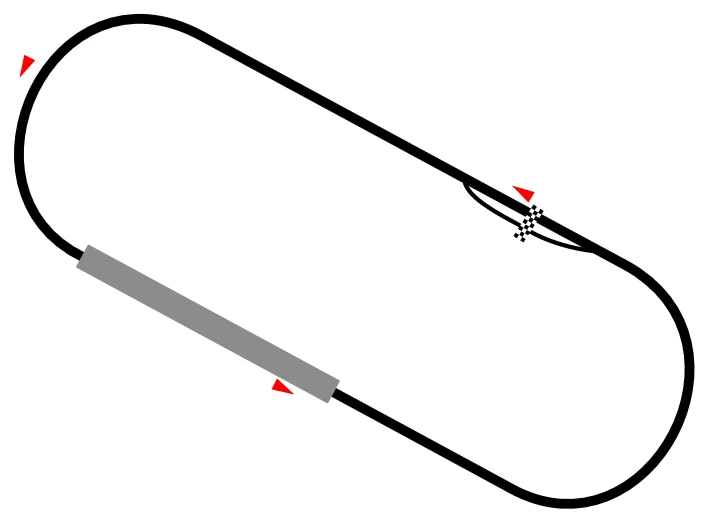
Mission 5
Your Car
Rival Car(s)
Track
- High-Speed Ring: Corner 2-3
In-game Information
First race through the left-hand banked corner. Aim to pass the rival car at the first right of the following S-bend by braking correctly. Be careful not to brake too late or you will drift outwards and you will be overtaken on the following bend.
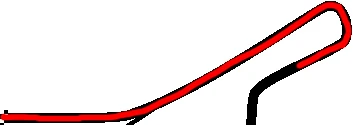
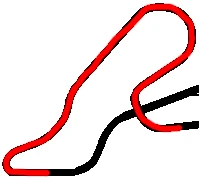
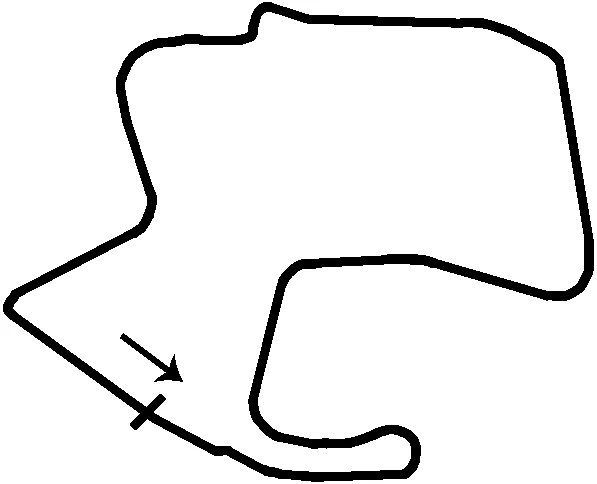
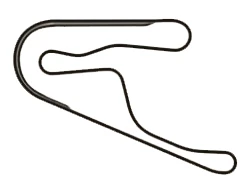
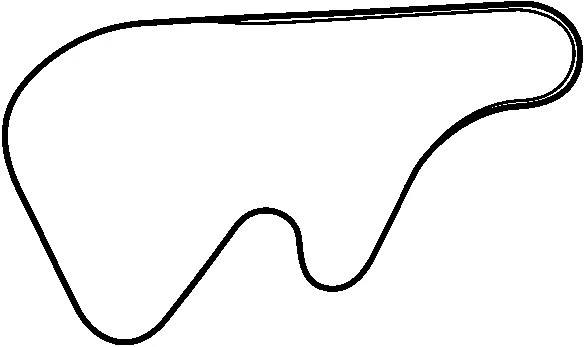
Mission 6
Your Car
Rival Car(s)
Track
- Tsukuba Circuit: Dunlop Bridge to Final Hairpin
In-game Information
This is an overtaking mission where you have to maintain a continuous driving rhythm through the tough part of the Tsukuba Circuit. First decide on the best way to come out of the Dunlop Corner, and then continue through the high-speed 80R and brake into the right hairpin. Be careful not to move too far towards outside of the corner.5
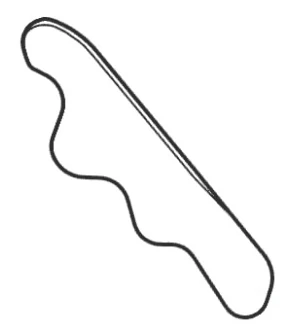
Mission 7
Your Car
Rival Car(s)
Track
- Midfield Raceway: Final hairpin
In-game Information
Close the gap in the first long sweeping left corner after exiting the tunnel. then pick up speed as you exit the corner. After the next gentle right, you can gain some distance taking a straight line as you are braking towards the inside of the tight left-hand corner.
Mission 8
Your Car
Rival Car(s)
Track
- Trial Mountain: 1st tunnel
In-game Information
Running straight through the high-speed S section with a smooth driving rhythm, the left corner leading to the tunnel becomes a passing point. The best strategy is to take the inside of your opponent as the road begins to climb. Be careful not to lose too much speed here or the other car could regain the lead upon exiting the corner.
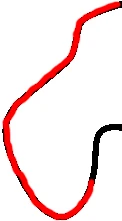
Mission 9
Your Car
Rival Car(s)
Track
- Twin Ring Motegi Road Course: 90-degree Corner
In-game Information
The right corner after the steep downhill straight is an ideal passing point. Although it is important to find the appropriate timing for braking in order to move to the inside, be mindful of taking a smooth line coming out of the corner - one that uses the full width of the course after you pass your rival.
Mission 10
Your Car
Rival Car(s)
Track
- Circuit de la Sarthe I: Mulsanne Straight
In-game Information
This is an overtaking mission where you need to pass three cars in succession at three locations: the first right-to-left chicane that appears after the straight, the second left-to-right chicane, and the final right-hand bend after the straight.
Missions 11-20: Three Lap Battles
Three Lap Battles either consists of equally-powered cars with a smaller head start or slightly-weaker cars with a significant head start to your car; the gap must be closed within 3 laps. Each race gives 10,000 credits per race.
Successful completion of Missions 11-20 rewards the player with a Jay Leno Tank Car '03.
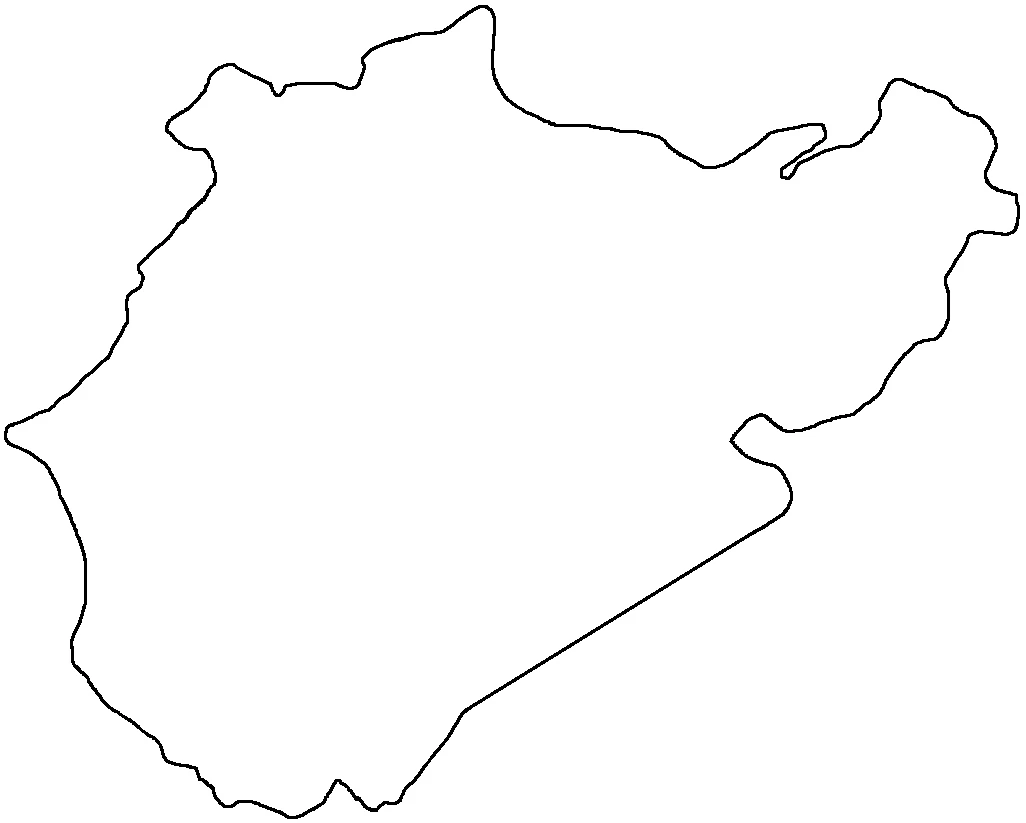
Mission 11
Your Car
Rival Car(s)
- Mazda 110S (L10B) '68
- Toyota CELICA 1600GT (TA22) '70
- Mitsubishi GALANT GTO MR '70
- Nissan SKYLINE 2000GT-B (S54A) '67
- Isuzu 117 COUPE '68
Track
- New York Reverse
In-game Information
You are driving a Toyota 2000GT, in front of you are Japanese cars from automotive history, including the 117 Coupe, Mitsubishi GTO-MR and the Cosmo Sports. Try to pass them one car at a time after coming out of the long New York straight.
Mission 12
Your Car
Rival Car(s)
- Dodge Viper GTS-R Team ORECA Race Car '00
- Chevrolet Corvette C5R (C5) '00
- Chevrolet Camaro LM Race Car '01
- Saleen S7 '02
- Dodge Viper GTS-R Concept '00
Track
- Mazda Raceway Laguna Seca
In-game Information
This is a tough mission, overtaking five cars over three laps. The rival cars are the same class of Dodge Viper GTSR, making this an all-out battle that demands no-holds-barred overtaking and precision cornering without losing speed.
Mission 13
Your Car
Rival Car(s)
- Ford Focus Rally Car '99
- Ford Escort Rally Car '98
- Toyota COROLLA Rally Car '98
- Mitsubishi Lancer Evolution VI Rally Car '99
- Citroën Xsara Rally Car '99
Track
- Opera Paris
In-game Information
This is the narrow and winding Paris street course: requiring aggressive overtaking with minimal braking from the long straight, and minor changes to your line for overtaking them both from the inside and outside. You need to be very careful not to lose speed by hitting the walls and from the slippery nature of the road surface.
Mission 14
Your Car
Rival Car(s)
- Plymouth Cuda 440 Six Pack '71
- Buick Special '62
- Dodge Charger Super Bee 426 Hemi '71
- Pontiac Tempest Le Mans GTO '64
- Mercury Cougar XR-7 '67
Track
- Seattle Circuit
In this showdown of muscle cars, you are in the Plymouth Superbird. You are going to pass all 5 American muscle car in this three laps of Seattle. The Superbird has bad handling and braking but the Special, while much faster in a straight line, performs worse in the corners. That may be a key to be close enough to the leader and take the first place.
Mission 15

Your Car
Rival Car(s)
- Alfa Romeo Giulia Sprint GTA 1600 '65
- Alfa Romeo Giulia Sprint Speciale '63
- Fiat 500 R '72
- Autobianchi A112 Abarth '79
- Alfa Romeo Spider 1600 Duetto '66
Track
- Côte d'Azur
As you know, this is the Italian Classics mission putting you in the Lancia Stratos chasing the Alfa Romeo Giulia Sprint GTA, requiring more aggression and balanced in cornering and straight road. But be aware that the car can slightly oversteer if the throttle is pressed too much in the corner, or if you brake and turn at the same time.
Mission 16
Your Car
Rival Car(s)
- Volkswagen New Beetle Cup Car '00
- Volkswagen New Beetle Cup Car '00
- Volkswagen New Beetle Cup Car '00
- Volkswagen New Beetle Cup Car '00
- Volkswagen New Beetle Cup Car '00
Track
- Suzuka Circuit
This is the Volkswagen 3 lap battle, held in Full-Course Suzuka with all-identical Beetle cup car, which means you have a level playing field. Try to get around a corner as fast as you can, but be aware that the car may tend to understeer. Keep an eye on it because that will make your car go off-track.
Mission 17
Your Car
Rival Car(s)
- Bentley Speed 8 Race Car '03
- Nissan FALKEN☆GT-R Race Car '04
- BMW M3 GTR Race Car '01
- Nissan MOTUL PITWORK Z (JGTC) '04
- Panoz Esperante GTR-1 Race Car '98
Track
- Infineon Raceway (Sports Car Course)
This mission brings you to test the Audi R8 Race Car at Infineon Raceway in an attempt to pursue the leader: the Bentley Speed 8. Try to drive calm and balanced on every corner and overtake opponent properly. This will make a great result.
Mission 18
Your Car
Rival Car(s)
- Bentley Speed 8 Race Car '03
- Mercedes-Benz CLK-GTR Race Car '98
- Mercedes-Benz Sauber Mercedes C9 Race Car '89
- Toyota GT-ONE Race Car (TS020) '99
- Panoz Esperante GTR-1 Race Car '98
Track
- Circuit de la Sarthe II
Now this mission takes place in Circuit de la Sarthe II where you are in a 1992 Nissan R92CP as you battle against top-end race cars. The key to winning is to concentrate on acceleration on every corner, straight speed, and the traction of the car. This makes a best time to chase the opponent and win the race.
Mission 19
Your Car
Rival Car(s)
- Amuse S2000 Street Version '04
- Amuse S2000 Street Version '04
- Amuse S2000 Street Version '04
- Amuse S2000 Street Version '04
- Amuse S2000 Street Version '04
Track
- Suzuka Circuit East
This is another identical car mission, held in Suzuka East. You are given an Amuse S2000 with enhanced performance. Try to keep the speed on every corner and slipstream an opponent at straight road to get closer to it. Be careful when you get too much speed and brake late, because if that happens, you're going off the track.
Mission 20
Your Car
Rival Car(s)
- Honda NSX Type R '02
- Mitsubishi Lancer Evolution VIII GSR '03
- Subaru IMPREZA Sedan WRX STi spec C (Type-II) '04
- Mazda RX-7 Spirit R Type A (FD) '02
- Nissan SKYLINE GT-R (R34) '99
Track:
This mission is unique from the other 3 Lap Battles, because in this mission, you'll be driving a slower car than the rest of the field. Luckily, the mm-R has better cornering and braking ability, as well as better tires, so use them to your advantage. Basically, you need to brake much later than the opponents, and out-corner them. This is the key to winning for this mission.
Missions 21-24: Slipstream Battles
These four missions are held in Test Course where you need to focus on the slipstreaming technique. Winning all four missions will reward you the Pagani Zonda LM Race Car.
Mission 21
Your Car
Rival Car(s)
- Nissan CUBE EX (FF/CVT) '02
- Nissan CUBE EX (FF/CVT) '02
- Nissan CUBE EX (FF/CVT) '02
- Nissan CUBE EX (FF/CVT) '02
- Nissan CUBE EX (FF/CVT) '02
Track
This is the start of the Slipstream Missions, So you play as the Nissan Cube EX, trying to maintain the goal, so you have to get in 1st place in overall. Slow down your car a bit and by the way try to take a minimum slipstreaming effect on every car.
Mission 22
Your Car
Rival Car(s)
Track:
- Test Course
This is the second Slipstream Mission, playing as the Honda Odyssey, the JDM Minivan. Try to maintain the goal, the challenge is similar to the previous one.
Mission 23
Your Car
Rival Car(s)
- Nissan SKYLINE GT-R (R34) '99
- Nissan SKYLINE GT-R (R34) '99
- Nissan SKYLINE GT-R (R34) '99
- Nissan SKYLINE GT-R (R34) '99
- Nissan SKYLINE GT-R (R34) '99
Track:
- Test Course
This might get difficult. You are using the Nissan Skyline GT-R R34, as 2nd to 5th are scrambled, the 1st is far away by 13 seconds. There are 2 ways to win this difficult task: Draft the opponents and when you reach the second place, let them pass you. Or, draft the opponents and when you reach the second place, let them hit you in the back (you won't get penalized).
Mission 24
Your Car
Rival Car(s)
Track:
- Test Course
This is the super high-speed Slipstream Mission which lasts 3 laps in the Amuse S2000 GT1. The key to win it is that the S2000 had a huge rear wing so the timing has to be perfect for drafting and overtake to take the 1st place.
Missions 25-29: 1 Lap Magic (I)
In this mission set, you start against much slower opponents with a significant time penalty and must overtake them within one lap. Complete this mission set and you will get the Toyota 7 Race Car.
Mission 25
Your Car
Rival Car(s)
- Nissan Fairlady Z 280Z-L 2seater (S130) '78
- Nissan Fairlady 240ZG (HS30) '71/Nissan 240ZG (HS30) '71
- Nissan Fairlady Z Version S (Z33) '02/Nissan 350Z (Z33, EU) '03/Nissan 350Z (Z33, US) '03
- Nissan Fairlady Z 300ZX TwinTurbo 2seater (Z32) '89/Nissan 300ZX 2seater (Z32) '89
- Nissan Fairlady Z 300ZX (Z31) '83
Track
This is the first 1 Lap Magic mission. Here's how 1 Lap Magic missions work: as explained above, you'll start from last place, but you'll always use a much better car than the field (in this case, the JGTC Nissan Z). The other 5 cars get a head start. This mission sees the lead car (the 280Z) start 35 seconds ahead of you. As you start, all you have to do is pass the 4 cars that separate you and the lead car as quickly as you can. Pass the lead car before the finish line to win.
Mission 26
Your Car
Rival Car(s)
- Honda S2000 '01
- Honda INTEGRA TYPE R (DC2) '95
- Honda BEAT '91
- Honda S500 '63
- Honda CIVIC 1500 3door CX '79
Track
Old meets New in this mission as you drive a JGTC Honda NSX around Suzuka. The lead car, which is a Honda S500, starts exactly a minute and a half before you do. One thing to note is that the track has many difficult corners, such as the 130R, so be careful when you try to overtake somebody. Get too cocky and you'll end up hitting an opponent and getting a penalty.
Mission 27
Your Car
Rival Car(s)
- RE Amemiya AMEMIYA ASPARADRINK RX7 (JGTC) '04
- Mazda 110S (L10A) '67
- Mazda RX-7 GT-X (FC, J) '90
- Mazda RX-7 Type RS (FD) '00
- Mazda RX-8 Type S '03
Track
In this mission you only have to overtake all the Mazda opponents at Laguna Seca. You'll be driving the Mazda 787B. Try to maintain the speed on every corner, as well as the Corkscrew. In the last corners you will able to overtake two cars just before they cross the finish line. There is also an opponent who drives a JGTC RX-7 in 5th position.
Mission 28
Your Car
Rival Car(s)
- Toyota CELICA 1600GT (TA22) '70
- Toyota CELICA XX 2800GT '81
- Toyota CELICA GT-FOUR (ST205) '98
- Toyota CELICA GT-FOUR RC (ST185) '91
- Toyota CELICA 2000GT-FOUR (ST165) '86
Track
It's a Celica Showdown, where you are in the Toyota Wedssport Celica, perfect for a Japanese race car set at Fuji Speedway 2005. Now that Fuji is renewed, you may feel some difference from the old one you just drove in the Nissan Showdown. The lead TA22 Celica starts 37 seconds ahead of you, but this gap is very easy to close if you know the track well. As usual, plan your moves and try to avoid the 5-second penalty.
Mission 29
Your Car
Rival Car(s)
- Chevrolet Corvette Convertible (C1) '54
- Chevrolet Corvette Coupe (C2) '63
- Chevrolet Corvette Stingray L46 350 (C3) '69
- Chevrolet Corvette GRAND SPORT (C4) '96
- Chevrolet Corvette Z06 (C5) '00
Track
In this mission you'll drive the Chevrolet Corvette C5-R Race Car around the Infineon Raceway within a number of old-to-new Corvette opponents from 6th to 1st in Corvette Showdown. Can you close the 44-second gap and beat the lead Corvette C1 to the finish line?
Missions 30-34: 1 Lap Magic (II)
This mission set gets a lot more difficult compared to the previous set of 1 Lap Magic missions. Win this and you will be awarded the Nissan R89C Race Car '89.
Mission 30
Your Car
Rival Car(s)
- Subaru 360 '58
- Subaru IMPREZA Sedan WRX STi spec C (Type-II) '04
- Subaru IMPREZA Premium Sport Coupe 22B-STi Version '98
- Subaru LEGACY B4 Blitzen '00
- Subaru LEGACY B4 3.0R '03
Track
- Tsukuba Circuit
You'll be driving a lap of Tsukuba in a 2003-spec Subaru Impreza Rally Car. The lead car, the Subaru 360, has a 53-second head start. The 360 is extremely slow, but don't expect it to be easy. The other 4 cars are quite similar in performance compared to each other, but is slower than your car, which can set you back a little bit and eventually cost you.
Mission 31
Your Car
Rival Car(s)
- Lotus Elan S1 '62
- Lotus Europa Special '71
- Lotus Elise '00
- Lotus Carlton '90
- Lotus Elise Sport 190 '98
Track
- High Speed Ring Reverse
You will be driving around the High Speed Ring Reverse Course. Your car is a 2002 model Lotus Esprit V8. The lead Lotus Elan starts 18 seconds before you get to start. Push as hard as you can because this mission can be quite close. Note that the car tends to understeer under braking, so don't use the trail-braking technique (when you brake and turn at the same time).
Mission 32
Your Car
Rival Car(s)
Track
- Seattle Circuit Reverse
In the Ford Showdown mission, you will be driving a newly-debuted Ford GT around Seattle Reverse. Your mission is to catch and pass the Ford Taurus, which gets to start 25 seconds before you, and take victory in this mission.
Mission 33
Your Car
Rival Car(s)
- Buick Special '62
- Buick GNX '87
- Pontiac Tempest Le Mans GTO '64
- Pontiac GTO 5.7 Coupe '04
- Pontiac Solstice Coupe Concept '02
Track
- Infineon Raceway (Sports Car Course)
In this mission, your car is the 750-horsepower Cadillac Cien. You start after the lead car 21 seconds. This car performs terribly when not in a straight line because it has very bad handling, very long gear shifting times(shifting from 1st gear to 2nd takes about a second), as well as poor brakes. Still, it performs better than the lead car, the Buick GNX.
Mission 34
Your Car
Rival Car(s)
- Mercedes-Benz 300 SL Coupe '54
- Mercedes-Benz SLK 230 Kompressor '98
- Mercedes-Benz 190 E 2.5 - 16 Evolution II '91
- Mercedes-Benz SL 65 AMG (R230) '04
- Mercedes-Benz SL 500 (R230) '02
Track
- Nürburgring Nordschleife
The final mission of Driving Missions section of the game. This mission is extremely difficult as you try to close a gap of 123 seconds between you (in a Mercedes SLR McLaren) and the lead car (the Mercedes 300SL), and that, even in a track like the Nordschleife, is a huge gap. To make matters worse, the SLR in this mission has average handling. The best tip here is to learn this track a lot. When you're confident enough that you think you might be able to beat this mission, go for it.